Androidアプリ入門 No.39 TableLayoutをActivityから操作する
TableLayout
TableLayoutをActivityから操作する
TableLayoutの以下の属性を使用すると最初は見せずに、後から指定の列を表示することができる。
| 属性 | 説明 |
|---|---|
| collapseColumns | 最初は表示されずに、setColumnCollapsedメソッドで表示することができる。 |
まず共通のstrings.xmlを以下に示す。
<?xml version="1.0" encoding="utf-8"?>
<resources>
    <string name="hello">Hello World, MainActivity!</string>
    <string name="app_name">ActivityTest</string>

    <style name="CodeFont">
        <item name="android:layout_width">wrap_content</item>
        <item name="android:layout_height">wrap_content</item>
        <item name="android:textColor">#000</item>
        <item name="android:textSize">26sp</item>
    </style>
</resources>
次にmain.xmlを以下に示す。
<?xml version="1.0" encoding="utf-8"?>
<TableLayout xmlns:android="http://schemas.android.com/apk/res/android"
    android:id="@+id/tableLayout"
    android:layout_width="fill_parent"
    android:layout_height="fill_parent"
    android:shrinkColumns="0,2"
    android:collapseColumns="0,2"
    >
    <TableRow>
        <TextView
            style="@style/CodeFont"
            android:text="1-1あいうえお"
            android:background="#fff"
            />
        <TextView
            style="@style/CodeFont"
            android:text="1-2あいうえお●▲■"
            android:background="#f00"
            />
        <TextView
            style="@style/CodeFont"
            android:text="1-3あいうえお"
            android:background="#0f0"
            />
    </TableRow>
    <TableRow>
        <TextView
            style="@style/CodeFont"
            android:text="2-1"
            android:background="#00f"
            android:layout_span="2"
            />
        <TextView
            style="@style/CodeFont"
            android:text="2-2"
            android:background="#ff0"
            />
    </TableRow>
    <TableRow>
        <Button
            android:id="@+id/button1"
            android:text="1列目を展開"
            android:layout_column="1"
            />
    </TableRow>
    <TableRow>
        <Button
            android:id="@+id/button2"
            android:text="3列目を展開"
            android:layout_column="1"
            />
    </TableRow>
</TableLayout>
最後にMainActivity.javaを以下に示す。
package sample.at;

import android.app.Activity;
import android.os.Bundle;
import android.view.View;
import android.view.View.OnClickListener;
import android.widget.Button;
import android.widget.TableLayout;

public class MainActivity extends Activity {
    private TableLayout tableLayout;
    private Button button1;
    private Button button2;

    @Override
    public void onCreate(Bundle savedInstanceState) {
        super.onCreate(savedInstanceState);
        setContentView(R.layout.main);

        tableLayout = (TableLayout) findViewById(R.id.tableLayout);
        button1 = (Button) findViewById(R.id.button1);
        button1.setOnClickListener(new OnClickListener() {
            @Override
            public void onClick(View view) {
                tableLayout.setColumnCollapsed(0, false);
            }
        });
        button2 = (Button) findViewById(R.id.button2);
        button2.setOnClickListener(new OnClickListener() {
            @Override
            public void onClick(View view) {
                tableLayout.setColumnCollapsed(2, false);
            }
        });
    }
}
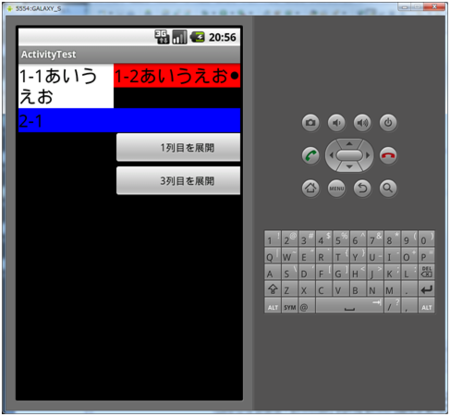
実行結果は以下。1列目を展開した後の画面となる。注意するのはTableLayout#setColumnCollapsedで表示する場合には2番目の引数にfalseを指定するところである。trueで表示せず、falseで表示する。
